Monday, October 15, 2012

Pumpkin Place Cards - with a twist


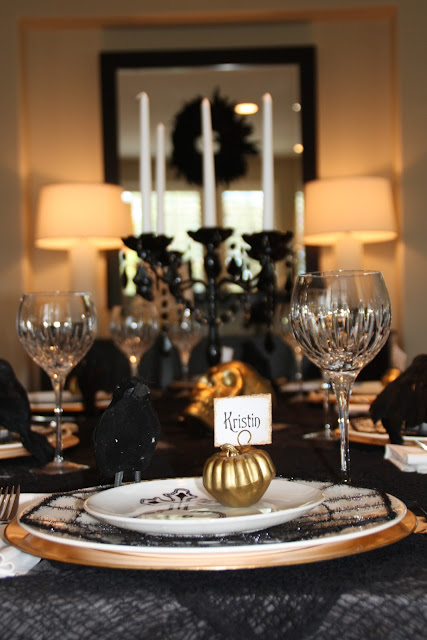
Another fun project I completed for my recent dinner party was a set of place cards.  Using a Halloween themed free font, I first printed the names on white textured card-stock / scrapbook paper.  Then to give the place cards an "aged" look, I hand tore the individual cards.  And finally, I gently dipped the edges in used coffee grounds.  I've used this technique before.  Last time it was for a pirate themed party.  It always turns out fabulous!  

Next, I whipped out the gold spray paint and sprayed some foam gourds.  I picked up a bag of gourds for less than $5 at Michaels.  But you can also pick up some similar designs on Amazon.  Then using Clipiola Italian spiral paper clips, I bent one end of the paperclip and poked it into the foam gourd.  
The place cards turned out fabulous.  They were SUPER simple.  And more than one of my guests asked if I had done the calligraphy on my own. 
I hope you enjoyed reading about another 
Fabulously Simple Idea.


Saturday, October 13, 2012

The Sharpie Plate - spookified

I've seen many pins on Pinterest about designing your own plates with a Sharpie.  Hmmmm, cheap and simple?  I just HAD to try it.  I started with plates from the 99cent Store and a Sharpie. 
Inspired by some Halloween die cuts I found at Michaels (and bought with a 40% off coupon), I drew designs on my plates and let them dry for 24 hours.

The next day I baked them at 350 degrees for 30 minutes.  Then, inspired by this gorgeous
tablescape, I prepared for our dinner party.  Simply FABULOUS!!!


From what I've researched, these plates should be non-toxic and food safe.  But, I noticed that with a little effort, the ink will rub off.  And who wants to be eating permanent marker?  I've decided to use them for decorative purposes only.  

I hope you're inspired to recreate your own fabulously simple plates.  What will you design?

Friday, October 5, 2012

Salt Dough Bones

 
Who doesn't find a vase full of skeletal remains somewhat spooky?  A perfect addition to my Haunted Parlor.  I really liked these and these.  But neither was exactly what I wanted.  One was out of my budget.  The other too crafty.  Then, I remembered how versatile salt dough can be.  Perfect!  I could make what I wanted and at basically no cost.  I had everything I needed in my kitchen pantry.  

I used a mixture of:
   1 cup salt
   2 cups all purpose flour
   1 cup water 

First, I kneaded the mixture by hand.  Then, with wet hands, I rolled the dough on the counter, formed bones by hand, and transferred them to a cookie sheet.  I then baked them at 250 degrees for about 4 hours.  This batch made about eight 8" bones.   
Truth be told, I lost one of the bones to a microwave mishap.  I'd read that salt dough can be quickly dried in the microwave.  My shortcut attempt resulted in a burnt cracked mess.  The slow bake method worked worlds better for me.  Time consuming, but worth the results.

I chose to leave the finished product "au naturale".  The yellowed and slightly bleached look goes very well with my sepia toned haunted parlor halloween decor.  But salt dough could easily be painted as well.   

I had fun making these.  Personally, I think they look pretty fabulous.  And of course, they were super simple to make!!

Monday, October 1, 2012

Lace Candles


October is here and Halloween is on the mind.  This year, I'm anxious to transform my home into a stylishly haunted parlor.  As always, Halloween crafting in my house needs to be SIMPLE and fabulous (of course).  I need to be able to start, complete, and clean-up my Halloween craft in a very short time frame - ideally while my little guy is at school and after I've gotten a workout in for the day.  This doesn't leave a whole lot of time.  Oh, and did I mention it needs to be done on the cheap?!?!  Halloween 2012 is on a strict budget!

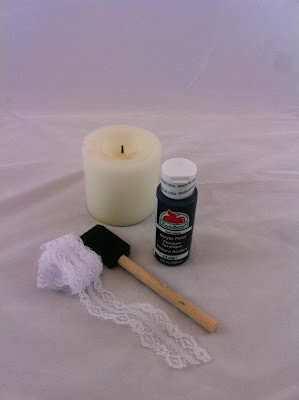
Enter lace candles.  On a recent visit to the bookstore, I was inspired by an article I spotted in Country Living.  Not my usual read, but I was inspired none-the-less.  Using supplies I had in my house (note the partially burned candle and well loved sponge brush), I recreated my own version. 

Voila!!  I'm very happy with the outcome and will be continue the spookification of our home soon (i.e. tomorrow).  I hope you're inspired by this fabulously simple idea!